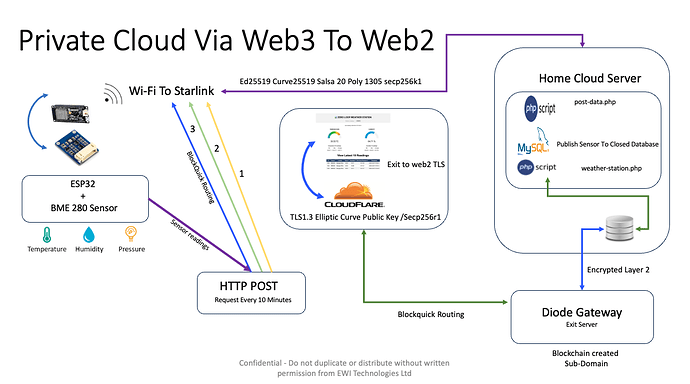
This post will demonstrate how to increase cloud security and use a diode client to publish a private cloud hosted behind your NAT-based home broadband or any broadband with no public IP and no 3rd party hosting service required. You could also run this on a private instance of AWS and achieve the same, but in no way removing all 3rd party interfaces.
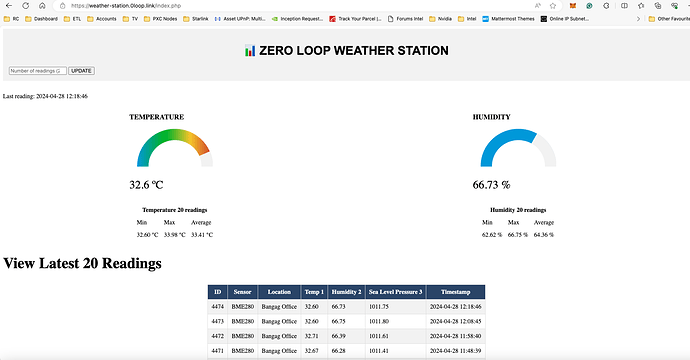
A working example is located here:Weather Station
The components of this are as follows:
- Raspberry Pi to host the database and PHP server
- Sensor that records to a database, in my example I am using a BME280
- Setup the sensor to publish readings to the database and make it available across the internet
- Set up a diode gateway and allow it to publish the database records out to the public internet through Cloudflare and wildcad sub domains / DNS without revealing the source of the sensor or readings, also removing any risks of the database being exposed and eventually hacked.
Step 1. Build the PI
I will assume that you have a raspberry pi built and you can access it via ssh, if not watch this PI setup video How to set up a Raspberry Pi (youtube.com)
Now let’s start to set up the server components
1. sudo apt install nginx, you should see in a browser the following:

2. Install PHP-FPM
php-fpm is a fast php interpretor. Install it using the below command.
sudo apt install php-fpm
Bind NGINX to PHP
Open up the NGINX virtual host config file (found here /etc/nginx/sites-enabled/default), and look for this line
index index.html index.htm index.nginx-debian.html;
and replace it with this line
index index.html index.htm index.php;
Next look for the config block in the virtual host config file (again found here /etc/nginx/sites-enabled/default) that starts with this:
location ~ \.php$ {
  ...
}
and uncomment it so it looks like this
location ~ \.php$ {
  include snippets/fastcgi-php.conf;
  fastcgi_pass unix:/var/run/php/php7.0-fpm.sock;
}
This will bind NGINX to the faster PHP interpretor (php-fpm) we just installed.
TEST PHP
To test that PHP is working, put a “index.php” file in the root directory of your webserver (by default “/var/www/html/”) and restart NGINX using the commands below:
echo "<?php phpinfo(); ?>" > /var/www/html/index.php

sudo /etc/init.d/nginx restart or sudo systemctl restart nginx
Now when you go to http://pi-ipaddress.local/ (replace “pi-ipaddress.local” with the IP address of your Raspberry Pi) you should see a page displaying information about PHP.
Lets Build MariaDB / Mysql and PHPMyAdmin to allow easy editing of databases
As always, start by updating your system :
sudo apt update
sudo apt upgrade
sudo apt install mariadb-server * Type “Y” and Enter to continue.
After a few seconds, the installation process is complete and MariaDB is almost ready to use.
The installation of MariaDB also installs the MariaDB client.
This will allow you to connect from the command line with:
mysql
By default, there is no account available to connect.
That’s why we need to create root access first, Here is how to define the password for the root user and start to use MariaDB:
-
Enter this command:
sudo mysql_secure_installation -
Press enter to continue (no password by default).
-
Press “Y” to switch to unix_socket authentication.
-
Then type “Y” to set a new password, and enter the password of your choice.
-
Now, press “Y” three more times to:
- Remove anonymous users.
- Disallow root login remotely.
- Remove the test database.
-
And finally, press “Y” again to reload the privileges.
MariaDB is ready to use with root login.
Now Connect with root
You can now use themysqlcommand for your first connection:
sudo mysql -uroot -p
Then enter the password you have defined previously.
And that’s it, you are connected to the MySQL server.
PHPMyAdmin Section
sudo apt install phpmyadmin
PHPMyAdmin will now begin to install on your Pi. It will require your input on various steps along the way. You will be presented with a screen asking the type of web server to install for.
-
Select the “
apache2” option by pressing SPACE and then ENTER. Select this option even if you are using NGINX, as we will configure that ourselves later on. -
Next, we will need to configure PHPMyAdmin to connect to our MYSQL server. We will also need set up some details so that we can log in to the PHPMyAdmin software.
To do this select “Yes” at the next prompt.
- It will now ask you to set a password for PHPMyAdmin itself. It is best to set this password to something different to your root SQL password. Doing this will help secure the server.
This password is what PHPMyAdmin will use to connect to the MySQL server.
- With the PHPMyAdmin installation process complete, there is one last thing we need to do. PHPMyAdmin by default will block you from logging into the PHPMyAdmin interface using the “root” user.
Instead, you will need to create a new user if you wish to create and access data tables within PHPMyAdmin.
To do this, we will need to first login to the MySQL command line interface using the “root” user with the password you set up.
sudo mysql -u root -p
- Now run the command below to create a user and permit it to access all databases on the MySQL server. Remember the details you enter here as you will use these to log in to PHPMyAdmin
Make sure you replace “username” with the username of your choice.
Also, replace “password” with a secure password of your choice.
GRANT ALL PRIVILEGES ON *.* TO 'root'@'localhost' IDENTIFIED BY 'password' WITH GRANT OPTION;
- You can exit out of the MySQL command line interface by typing “quit” in the terminal.
Once done you can proceed to configure PHPMyAdmin for NGINX.
7. Configuring NGINX for PHPMyAdmin
1. To setup NGINX to work with PHPMyAdmin, we need to do is create a link between the phpmyadmin folder and our root HTML directory.
To do this, we need to run the following command on our Raspberry Pi.
sudo ln -s /usr/share/phpmyadmin /var/www/html
8. Accessing PHPMyAdmin
1. You should now be able to access your Raspberry Pi’s PHPMyAdmin interface from a web browser.
To test this, go to the following address in your favorite web browser. Use the user you created earlier on in the tutorial to log in. Do not use your root user as this is disabled by default.
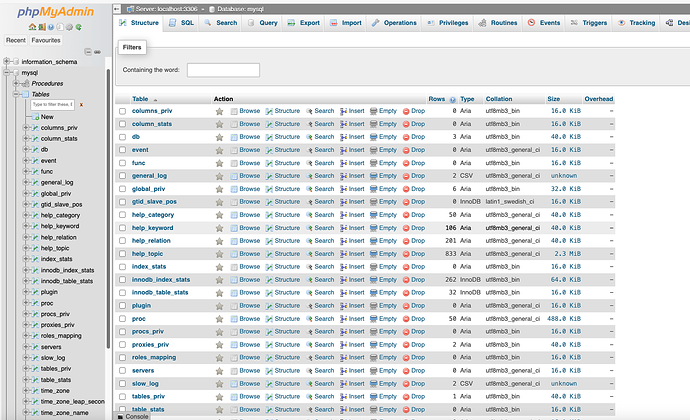
Remember to replace the IP Address with your Raspberry Pi’s IP Address. (If you don’t have it, run the hostname –I command on your Raspberry Pi ) You should see a login box like below.
http://MY-IPADDRESS/phpmyadmin
Now go grab a coffee, you now have your private server, and cloud database all setup, and we will now start to put data into this database with an example sensor reading.
The first bit of code to prep for the sensor is setting up the tables and so on
Creating a SQL table
Login to phpMyAdmin and create a new database called esp_data
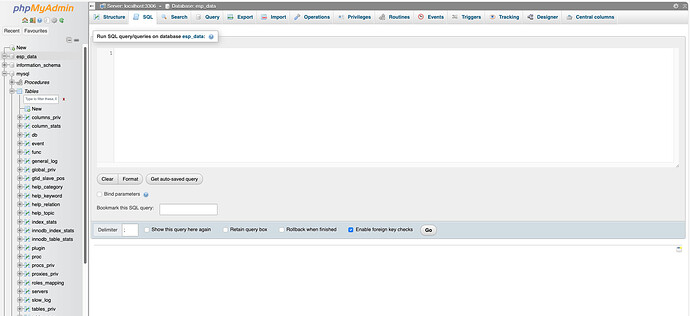
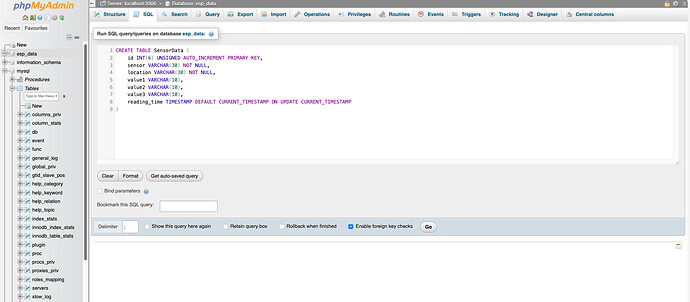
In the left sidebar, select your database name example_esp_data and open the “SQL” tab.
In the left sidebar, select your database name example_esp_data and open the “SQL” tab.
Copy the SQL query in the following snippet:
CREATE TABLE SensorData (
    id INT(6) UNSIGNED AUTO_INCREMENT PRIMARY KEY,
    sensor VARCHAR(30) NOT NULL,
    location VARCHAR(30) NOT NULL,
    value1 VARCHAR(10),
    value2 VARCHAR(10),
    value3 VARCHAR(10),
    reading_time TIMESTAMP DEFAULT CURRENT_TIMESTAMP ON UPDATE CURRENT_TIMESTAMP
)
Paste it in the SQL query field (as per the SQL box below and press the “Go” button to create your table:
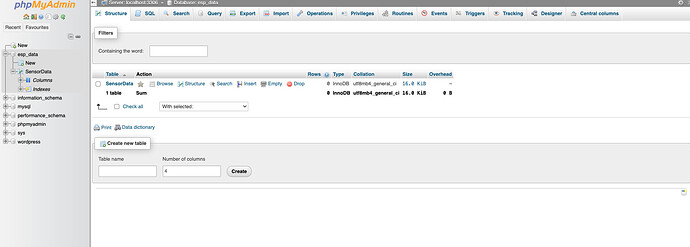
After that, you should see your newly created table called SensorData in the esp_data database as shown in the figure below:
PHP Script HTTP POST – Receive and Insert Data in MySQL Database
In this section, we’ll create a PHP script to receive incoming requests from the ESP32 or ESP8266 and insert the data into a MySQL database.
in your PI cli go to /var/www/html and create a new file called esp-post-data.php you can use
nano esp-post-data.php and then paste in this code to receive the data from your sensor.
<?php
  include_once('esp-database.php');

  // Keep this API Key value to be compatible with the ESP code provided in the project page. If you change this value, the ESP sketch needs to match
  $api_key_value = "tPmAT5Ab3j7F9";

  $api_key= $sensor = $location = $value1 = $value2 = $value3 = "";

  if ($_SERVER["REQUEST_METHOD"] == "POST") {
    $api_key = test_input($_POST["api_key"]);
    if($api_key == $api_key_value) {
      $sensor = test_input($_POST["sensor"]);
      $location = test_input($_POST["location"]);
      $value1 = test_input($_POST["value1"]);
      $value2 = test_input($_POST["value2"]);
      $value3 = test_input($_POST["value3"]);

      $result = insertReading($sensor, $location, $value1, $value2, $value3);
      echo $result;
    }
    else {
      echo "Wrong API Key provided.";
    }
  }
  else {
    echo "No data posted with HTTP POST.";
  }

  function test_input($data) {
    $data = trim($data);
    $data = stripslashes($data);
    $data = htmlspecialchars($data);
    return $data;
  }
PHP Script for Database Functions
Create a new file in /var/www/html that is responsible for inserting and accessing data in your database. Name your file: esp-database.php
paste this into the file
<?php
  $servername = "localhost";

  // REPLACE with your Database name
  $dbname = "REPLACE_WITH_YOUR_DATABASE_NAME";
  // REPLACE with Database user
  $username = "REPLACE_WITH_YOUR_USERNAME";
  // REPLACE with Database user password
  $password = "REPLACE_WITH_YOUR_PASSWORD";

  function insertReading($sensor, $location, $value1, $value2, $value3) {
    global $servername, $username, $password, $dbname;

    // Create connection
    $conn = new mysqli($servername, $username, $password, $dbname);
    // Check connection
    if ($conn->connect_error) {
      die("Connection failed: " . $conn->connect_error);
    }

    $sql = "INSERT INTO SensorData (sensor, location, value1, value2, value3)
    VALUES ('" . $sensor . "', '" . $location . "', '" . $value1 . "', '" . $value2 . "', '" . $value3 . "')";

    if ($conn->query($sql) === TRUE) {
      return "New record created successfully";
    }
    else {
      return "Error: " . $sql . "<br>" . $conn->error;
    }
    $conn->close();
  }

  function getAllReadings($limit) {
    global $servername, $username, $password, $dbname;

    // Create connection
    $conn = new mysqli($servername, $username, $password, $dbname);
    // Check connection
    if ($conn->connect_error) {
      die("Connection failed: " . $conn->connect_error);
    }

    $sql = "SELECT id, sensor, location, value1, value2, value3, reading_time FROM SensorData order by reading_time desc limit " . $limit;
    if ($result = $conn->query($sql)) {
      return $result;
    }
    else {
      return false;
    }
    $conn->close();
  }
  function getLastReadings() {
    global $servername, $username, $password, $dbname;

    // Create connection
    $conn = new mysqli($servername, $username, $password, $dbname);
    // Check connection
    if ($conn->connect_error) {
      die("Connection failed: " . $conn->connect_error);
    }

    $sql = "SELECT id, sensor, location, value1, value2, value3, reading_time FROM SensorData order by reading_time desc limit 1" ;
    if ($result = $conn->query($sql)) {
      return $result->fetch_assoc();
    }
    else {
      return false;
    }
    $conn->close();
  }

  function minReading($limit, $value) {
     global $servername, $username, $password, $dbname;

    // Create connection
    $conn = new mysqli($servername, $username, $password, $dbname);
    // Check connection
    if ($conn->connect_error) {
      die("Connection failed: " . $conn->connect_error);
    }

    $sql = "SELECT MIN(" . $value . ") AS min_amount FROM (SELECT " . $value . " FROM SensorData order by reading_time desc limit " . $limit . ") AS min";
    if ($result = $conn->query($sql)) {
      return $result->fetch_assoc();
    }
    else {
      return false;
    }
    $conn->close();
  }

  function maxReading($limit, $value) {
     global $servername, $username, $password, $dbname;

    // Create connection
    $conn = new mysqli($servername, $username, $password, $dbname);
    // Check connection
    if ($conn->connect_error) {
      die("Connection failed: " . $conn->connect_error);
    }

    $sql = "SELECT MAX(" . $value . ") AS max_amount FROM (SELECT " . $value . " FROM SensorData order by reading_time desc limit " . $limit . ") AS max";
    if ($result = $conn->query($sql)) {
      return $result->fetch_assoc();
    }
    else {
      return false;
    }
    $conn->close();
  }

  function avgReading($limit, $value) {
     global $servername, $username, $password, $dbname;

    // Create connection
    $conn = new mysqli($servername, $username, $password, $dbname);
    // Check connection
    if ($conn->connect_error) {
      die("Connection failed: " . $conn->connect_error);
    }

    $sql = "SELECT AVG(" . $value . ") AS avg_amount FROM (SELECT " . $value . " FROM SensorData order by reading_time desc limit " . $limit . ") AS avg";
    if ($result = $conn->query($sql)) {
      return $result->fetch_assoc();
    }
    else {
      return false;
    }
    $conn->close();
  }
?>
Before saving the file, you need to modify the $dbname, $username and $password variables with your unique details:
// Your Database name
$dbname = "esp_data";
// Your Database user
$username = "esp_board";
// Your Database user password
$password = "YOUR_USER_PASSWORD";
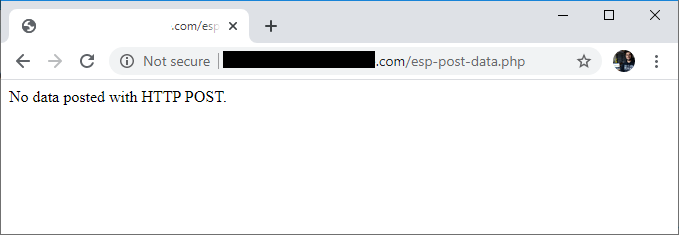
After adding the database name, username and password, save the file and continue. As we don’t require a domain name with a private cloud, just access your IP address in the next URL path, and you’ll see the following:
https://my-ipaddress.com/esp-post-data.php
We will cover the domain name in the next part of the tutorial covering diode.
PHP Script – Display Database Readings on Gauges and Table
We will add a CSS file to style the dashboard and make it look nice, name it: esp-style.css:
body {
    width: 60%;
    margin: auto;
    text-align: center;
    font-family: Arial;
    top: 50%;
    left: 50%;
}

@media screen and (max-width: 800px) {
    body {
        width: 100%;
    }
}

table {
    margin-left: auto;
    margin-right: auto;
}

div {
    margin-left: auto;
    margin-right: auto;
}

h2 { font-size: 2.5rem; }

.header {
	 padding: 1rem;
	 margin: 0 0 2rem 0;
	 background: #f2f2f2;
}

h1 {
    font-size: 2rem;
    font-family: Arial, sans-serif;
    text-align: center;
    text-transform: uppercase;
}

.content {
    display: flex;
}

@media screen and (max-width: 500px) /* Mobile */ {
    .content {
        flex-direction: column;
    }
}

.mask {
    position: relative;
    overflow: hidden;
    display: block;
    width: 12.5rem;
    height: 6.25rem;
    margin: 1.25rem;
}

.semi-circle {
    position: relative;
    display: block;
    width: 12.5rem;
    height: 6.25rem;
    background: linear-gradient(to right, #3498db 0%, #05b027 33%, #f1c40f 70%, #c0392b 100%);
    border-radius: 50% 50% 50% 50% / 100% 100% 0% 0%;
}

.semi-circle::before {
    content: "";
    position: absolute;
    bottom: 0;
    left: 50%;
    z-index: 2;
    display: block;
    width: 8.75rem;
    height: 4.375rem;
    margin-left: -4.375rem;
    background: #fff;
    border-radius: 50% 50% 50% 50% / 100% 100% 0% 0%;
}

.semi-circle--mask {
    position: absolute;
    top: 0;
    left: 0;
    width: 12.5rem;
    height: 12.5rem;
    background: transparent;
    transform: rotate(120deg) translate3d(0, 0, 0);
    transform-origin: center center;
    backface-visibility: hidden;
    transition: all 0.3s ease-in-out;
}

.semi-circle--mask::before {
    content: "";
    position: absolute;
    top: 0;
    left: 0%;
    z-index: 2;
    display: block;
    width: 12.625rem;
    height: 6.375rem;
    margin: -1px 0 0 -1px;
    background: #f2f2f2;
    border-radius: 50% 50% 50% 50% / 100% 100% 0% 0%;
}

.gauge--2 .semi-circle { background: #3498db; }

.gauge--2 .semi-circle--mask { transform: rotate(20deg) translate3d(0, 0, 0); }

#tableReadings { border-collapse: collapse; }

#tableReadings td, #tableReadings th {
    border: 1px solid #ddd;
    padding: 10px;
}

#tableReadings tr:nth-child(even){ background-color: #f2f2f2; }

#tableReadings tr:hover { background-color: #ddd; }

#tableReadings th {
    padding: 10px;
    background-color: #2f4468;
    color: white;
}
Paste that code into another file with nano esp-style.css in the same location /var/www/html
Finally, create another PHP file in the /var/www/html directory this will display all the database content on a web page that we will publish with diode. Nano esp-weather-station.php
and paste the following code:
<?php
include_once('esp-database.php');
if (isset($_GET["readingsCount"])){
$data = $_GET["readingsCount"];
$data = trim($data);
$data = stripslashes($data);
$data = htmlspecialchars($data);
$readings_count = $_GET["readingsCount"];
}
// default readings count set to 20
else {
$readings_count = 20;
}
$last_reading = getLastReadings();
$last_reading_temp = $last_reading["value1"];
$last_reading_humi = $last_reading["value2"];
$last_reading_time = $last_reading["reading_time"];
// Uncomment to set timezone to - 1 hour (you can change 1 to any number)
//$last_reading_time = date("Y-m-d H:i:s", strtotime("$last_reading_time - 1 hours"));
// Uncomment to set timezone to + 7 hours (you can change 7 to any number)
//$last_reading_time = date("Y-m-d H:i:s", strtotime("$last_reading_time + 7 hours"));
$min_temp = minReading($readings_count, 'value1');
$max_temp = maxReading($readings_count, 'value1');
$avg_temp = avgReading($readings_count, 'value1');
$min_humi = minReading($readings_count, 'value2');
$max_humi = maxReading($readings_count, 'value2');
$avg_humi = avgReading($readings_count, 'value2');
?>
<!DOCTYPE html>
<html>
<head><meta http-equiv="Content-Type" content="text/html; charset=utf-8">
<link rel="stylesheet" type="text/css" href="esp-style.css">
<meta name="viewport" content="width=device-width, initial-scale=1">
<script src="https://ajax.googleapis.com/ajax/libs/jquery/3.4.1/jquery.min.js"></script>
</head>
<header class="header">
<h1>📊 ESP Weather Station</h1>
<form method="get">
<input type="number" name="readingsCount" min="1" placeholder="Number of readings (<?php echo $readings_count; ?>)">
<input type="submit" value="UPDATE">
</form>
</header>
<body>
<p>Last reading: <?php echo $last_reading_time; ?></p>
<section class="content">
<div class="box gauge--1">
<h3>TEMPERATURE</h3>
<div class="mask">
<div class="semi-circle"></div>
<div class="semi-circle--mask"></div>
</div>
<p style="font-size: 30px;" id="temp">--</p>
<table cellspacing="5" cellpadding="5">
<tr>
<th colspan="3">Temperature <?php echo $readings_count; ?> readings</th>
</tr>
<tr>
<td>Min</td>
<td>Max</td>
<td>Average</td>
</tr>
<tr>
<td><?php echo $min_temp['min_amount']; ?> °C</td>
<td><?php echo $max_temp['max_amount']; ?> °C</td>
<td><?php echo round($avg_temp['avg_amount'], 2); ?> °C</td>
</tr>
</table>
</div>
<div class="box gauge--2">
<h3>HUMIDITY</h3>
<div class="mask">
<div class="semi-circle"></div>
<div class="semi-circle--mask"></div>
</div>
<p style="font-size: 30px;" id="humi">--</p>
<table cellspacing="5" cellpadding="5">
<tr>
<th colspan="3">Humidity <?php echo $readings_count; ?> readings</th>
</tr>
<tr>
<td>Min</td>
<td>Max</td>
<td>Average</td>
</tr>
<tr>
<td><?php echo $min_humi['min_amount']; ?> %</td>
<td><?php echo $max_humi['max_amount']; ?> %</td>
<td><?php echo round($avg_humi['avg_amount'], 2); ?> %</td>
</tr>
</table>
</div>
</section>
<?php
echo '<h2> View Latest ' . $readings_count . ' Readings</h2>
<table cellspacing="5" cellpadding="5" id="tableReadings">
<tr>
<th>ID</th>
<th>Sensor</th>
<th>Location</th>
<th>Value 1</th>
<th>Value 2</th>
<th>Value 3</th>
<th>Timestamp</th>
</tr>';
$result = getAllReadings($readings_count);
if ($result) {
while ($row = $result->fetch_assoc()) {
$row_id = $row["id"];
$row_sensor = $row["sensor"];
$row_location = $row["location"];
$row_value1 = $row["value1"];
$row_value2 = $row["value2"];
$row_value3 = $row["value3"];
$row_reading_time = $row["reading_time"];
// Uncomment to set timezone to - 1 hour (you can change 1 to any number)
//$row_reading_time = date("Y-m-d H:i:s", strtotime("$row_reading_time - 1 hours"));
// Uncomment to set timezone to + 7 hours (you can change 7 to any number)
//$row_reading_time = date("Y-m-d H:i:s", strtotime("$row_reading_time + 7 hours"));
echo '<tr>
<td>' . $row_id . '</td>
<td>' . $row_sensor . '</td>
<td>' . $row_location . '</td>
<td>' . $row_value1 . '</td>
<td>' . $row_value2 . '</td>
<td>' . $row_value3 . '</td>
<td>' . $row_reading_time . '</td>
</tr>';
}
echo '</table>';
$result->free();
}
?>
<script>
var value1 = <?php echo $last_reading_temp; ?>;
var value2 = <?php echo $last_reading_humi; ?>;
setTemperature(value1);
setHumidity(value2);
function setTemperature(curVal){
//set range for Temperature in Celsius -5 Celsius to 38 Celsius
var minTemp = -5.0;
var maxTemp = 38.0;
//set range for Temperature in Fahrenheit 23 Fahrenheit to 100 Fahrenheit
//var minTemp = 23;
//var maxTemp = 100;
var newVal = scaleValue(curVal, [minTemp, maxTemp], [0, 180]);
$('.gauge--1 .semi-circle--mask').attr({
style: '-webkit-transform: rotate(' + newVal + 'deg);' +
'-moz-transform: rotate(' + newVal + 'deg);' +
'transform: rotate(' + newVal + 'deg);'
});
$("#temp").text(curVal + ' ºC');
}
function setHumidity(curVal){
//set range for Humidity percentage 0 % to 100 %
var minHumi = 0;
var maxHumi = 100;
var newVal = scaleValue(curVal, [minHumi, maxHumi], [0, 180]);
$('.gauge--2 .semi-circle--mask').attr({
style: '-webkit-transform: rotate(' + newVal + 'deg);' +
'-moz-transform: rotate(' + newVal + 'deg);' +
'transform: rotate(' + newVal + 'deg);'
});
$("#humi").text(curVal + ' %');
}
function scaleValue(value, from, to) {
var scale = (to[1] - to[0]) / (from[1] - from[0]);
var capped = Math.min(from[1], Math.max(from[0], value)) - from[0];
return ~~(capped * scale + to[0]);
}
</script>
</body>
</html>
If you now try to access your Pi’s IP address, you’ll see the following example that I have running, at the moment you won’t have any data to show, this will be our next step:
https://my-ipaddress/esp-weather-station.php (you can rename this to index.php to make it easier to load)
That’s it! If you see that web page with empty values in your browser, it means that everything is ready. In the next section, you’ll learn how to insert data from your ESP32 in to the database.
Programming Sensors is a wide topic and I have chosen the easiest way to get started, if your unfamiliar with Arduino, I suggest you start here ESP32 Arduino Setup
Setting Up the ESP32
This project will use the ESP32 board. It just needs a simple circuit and then upload the sketch provided to insert temperature, humidity, pressure, and more into your database every 10 minutes.
Parts Required
For this example, we’ll get sensor readings from the BME280 sensor. Here’s a list of parts you need to build the circuit for this project:
-
ESP32 board (read Best ESP32 dev boards)
-
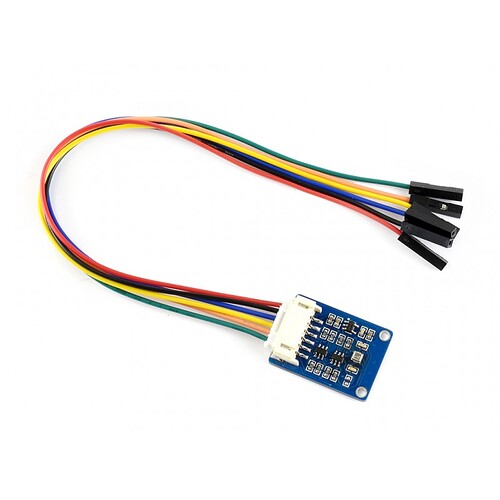
Breadboard I found a BME280 sensor with wires already attached, just click here, I use waveshare a lot
In my experience you can use any BME280 sensor as long as you know the wires and functions, some are addressed for High address 0x77 and some are addressed for low address 0x76, if your not sure which one it is you can use this code to find out which address its set for, just add this code into arduino and upload it to the esp32 with BME 270 attached and you will see it printed to the serial monitor on Arduino. This solves most issues with no sensor data reported when loading the sensor code up to the ESP32, after that its mostly wiring issues. After getting the I2C sensor address, make sure you use the right address in your code. also for further troubleshooting you can refer to the manual here BME 280 Support Manual
#include <Wire.h>

void setup() {
  Wire.begin();
  Serial.begin(115200);
  Serial.println("\nI2C Scanner");
}

void loop() {
  byte error, address;
  int nDevices;
  Serial.println("Scanning...");
  nDevices = 0;
  for(address = 1; address < 127; address++ ) {
    Wire.beginTransmission(address);
    error = Wire.endTransmission();
    if (error == 0) {
      Serial.print("I2C device found at address 0x");
      if (address<16) {
        Serial.print("0");
      }
      Serial.println(address,HEX);
      nDevices++;
    }
    else if (error==4) {
      Serial.print("Unknow error at address 0x");
      if (address<16) {
        Serial.print("0");
      }
      Serial.println(address,HEX);
    }
  }
  if (nDevices == 0) {
    Serial.println("No I2C devices found\n");
  }
  else {
    Serial.println("done\n");
  }
  delay(5000);
}
Schematics
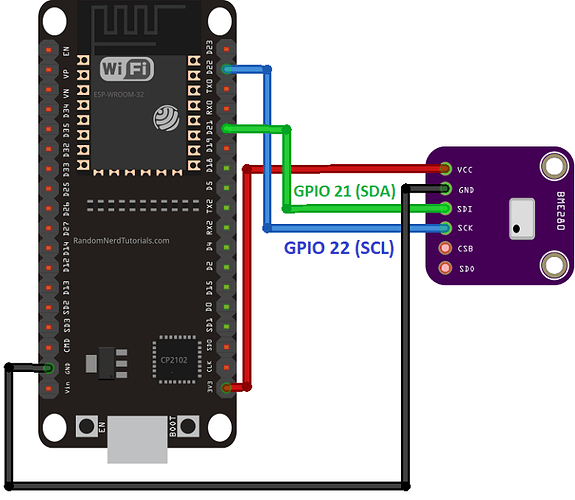
The BME280 sensor module we’re using communicates via I2C communication protocol, so you need to connect it to the ESP32 I2C pins.
BME280 wiring to ESP32
The ESP32 I2C pins are:
- GPIO 22: SCL (SCK)
- GPIO 21: SDA (SDI)
So, assemble your circuit as shown in the next schematic diagram
For example, on my module, the wire colours were pin D22 SCL/SCK (diagram Blue) Yellow Pin D21 SDA/SDI Blue (diagram Green) pin 3v3 is Red (diagram Red) pin GND is black (diagram Black)
Installing The Relevant Arduino Libraries
We’ll program the ESP32 using Arduino IDE, so you must have the ESP add-on installed in your Arduino IDE.
The next step is to install the relevant supporting libraries for the esp32 to communicate with the BME280
Installing the BME280 library
To get readings from the BME280 sensor module you need to use the Adafruit_BME280 library. Follow the next steps to install the library in your Arduino IDE:
Installing the Adafruit_Sensor library
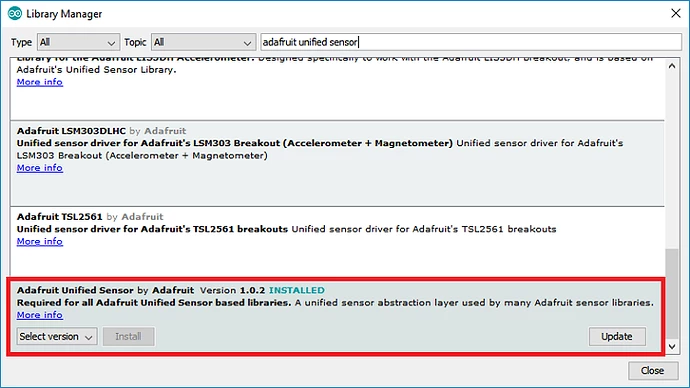
To use the BME280 library, you also need to install the Adafruit_Sensor library. Follow the next steps to install the library in your Arduino IDE:
Go to Sketch > Include Library > Manage Libraries and type “Adafruit Unified Sensor” in the search box. Scroll all the way down to find the library and install it.
After installing the libraries, restart your Arduino IDE.
