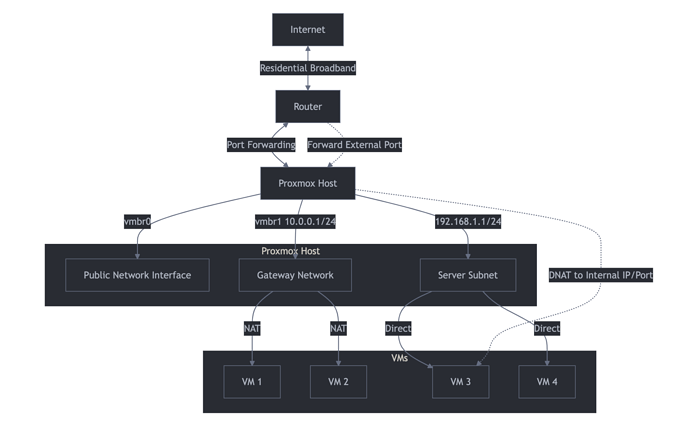
Step 1: Proxmox Setup
- Install Proxmox:
- Download the Proxmox VE ISO from the official website I recommend 7.4 and upgrade to 8.x due to iso issues with usb sticks.
- Create a bootable USB drive with the ISO
- Install Proxmox on your dedicated machine
- upgrade 7.4 to latest 8.x Be aware that the upgrade process changes the port naming from emo8 to eno8np3 etc it appears broken but just change the vmbr0 to point to the correct interface and you will come back alive. Also if you have a 7.4-3, you need minimum 7.4-15 all you need to do is change the apt sources to old-release instead of archive and it will get you the upgrade to 7.4-19 then you can run pve7to8 tool.
- Configure Network:
- Set static IP for Proxmox host (e.g., 192.168.1.10)
- Configure vmbr0 as the main bridge for LAN (192.168.1.0/24)
- Create vmbr1 for VM network (10.0.0.0/24) This is where you host the lite node.
- Set Up NAT:
- Enable IP forwarding:
echo 1 > /proc/sys/net/ipv4/ip_forward - Add to /etc/sysctl.conf:
net.ipv4.ip_forward = 1 - Configure iptables for NAT:
iptables -t nat -A POSTROUTING -s 10.0.0.0/24 -o vmbr0 -j MASQUERADE
4. Configure Port Forwarding:
- On your router, forward desired ports to Proxmox host (192.168.1.10)
- On Proxmox, set up iptables rules to forward to VMs:
auto vmbr1
iface vmbr1 inet static
address 10.0.0.1
netmask 255.255.255.0
bridge_ports none
bridge_stp off
bridge_fd 0

post-up iptables -t nat -A POSTROUTING -s '10.0.0.0/24' -o vmbr0 -j MASQUERADE

post-down iptables -t nat -D POSTROUTING -s '10.0.0.0/24' -o vmbr0 -j MASQUERADE

post-up   iptables -t nat -A PREROUTING -i vmbr0 -p tcp --dport 8545 -j DNAT --to 10.0.0.200:8545

post-down iptables -t nat -D PREROUTING -i vmbr0 -p tcp --dport 8545 -j DNAT --to 10.0.0.200:8545

post-up   iptables -t nat -A PREROUTING -i vmbr0 -p tcp --dport 41046 -j DNAT --to 10.0.0.200:41046

post-down iptables -t nat -D PREROUTING -i vmbr0 -p tcp --dport 41046 -j DNAT --to 10.0.0.200:41046

post-up   iptables -t nat -A PREROUTING -i vmbr0 -p tcp --dport 1723 -j DNAT --to 10.0.0.200:1723

post-down iptables -t nat -D PREROUTING -i vmbr0 -p tcp --dport 1723 -j DNAT --to 10.0.0.200:1723

post-up   iptables -t nat -A PREROUTING -i vmbr0 -p tcp --dport 51055 -j DNAT --to 10.0.0.200:51055

post-down iptables -t nat -D PREROUTING -i vmbr0 -p tcp --dport 51055 -j DNAT --to 10.0.0.200:51055

post-up   iptables -t nat -A PREROUTING -i vmbr0 -p tcp --dport 993 -j DNAT --to 10.0.0.200:993

post-down iptables -t nat -D PREROUTING -i vmbr0 -p tcp --dport 993 -j DNAT --to 10.0.0.200:993

post-up   iptables -t nat -A PREROUTING -i vmbr0 -p tcp --dport 443 -j DNAT --to 10.0.0.200:443

post-down iptables -t nat -D PREROUTING -i vmbr0 -p tcp --dport 443 -j DNAT --to 10.0.0.200:443

post-up   iptables -t nat -A PREROUTING -i vmbr0 -p udp --dport 10000 -j DNAT --to 10.0.0.200:10000

post-down iptables -t nat -D PREROUTING -i vmbr0 -p udp --dport 10000 -j DNAT --to 10.0.0.200:10000
you can reload the routing tables by running ifreload -a at the cli on the proxmox host.
- Create VMs:
- Use Proxmox web interface to create and manage VMs
- Assign VMs to appropriate network (vmbr0 or vmbr1)
- Secure Your Setup:
- Make sure to forward ports from your residential router to the public ip, study the above diagram to understand how the paths and forwards work.
- Change default Proxmox password
- Set up a firewall on Proxmox host
- Keep Proxmox and VMs updated
Step 2: Diode Lite Node Setup
- Create Ubuntu VM:
- Use Proxmox to create a new Ubuntu VM
- Assign it to the appropriate network (e.g., 10.0.0.0/24)
- Install Snap:
- Update system:
sudo apt update && sudo apt upgrade -y - Install Snap:
sudo apt install snapd -y
- Install Diode Lite Node:
sudo snap install diode-node --edge
- Configure Diode Node:
- Set host IP:
sudo snap set diode-node host=10.0.0.X
Replace X with the VM’s IP in the 10.0.0.0/24 network
- Set edge ports:
sudo snap set diode-node edge2-port=41046,1723,10000
5. Port Forwarding for Diode Node:
- On Proxmox host, forward the Diode edge ports to the VM:
iptables -t nat -A PREROUTING -i vmbr0 -p tcp --dport 41046 -j DNAT --to-destination 10.0.0.X:41046 iptables -t nat -A PREROUTING -i vmbr0 -p tcp --dport 1723 -j DNAT --to-destination 10.0.0.X:1723 iptables -t nat -A PREROUTING -i vmbr0 -p tcp --dport 10000 -j DNAT --to-destination 10.0.0.X:10000
Replace X with the VM’s IP in the 10.0.0.0/24 network
- On your router, ensure these ports are forwarded to the Proxmox host
- Manage Diode Node:
- View info:
diode-node.info - Start service:
sudo snap start diode-node - Stop service:
sudo snap stop diode-node - Restart service:
sudo snap restart diode-node
Once you get your head around the setup, with diode you literally can publish any service from proxmox out to the blockchain, no more hosting fees. Any questions let me know and happy to help.
