Use diode as your own VPN and remove any 3rd parties in the process
here’s a step-by-step guide to setting up a server with UpCloud:
-
Sign Up/Login to UpCloud:
• If you haven’t already, go to the UpCloud website and sign up for an account. If you have an account, log in. -
Create a New Server:
• Once logged in, navigate to the control panel or dashboard.
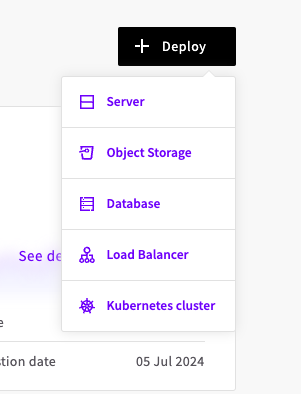
• Look for an option "Deploy " and click on it.

-
Choose Server Configuration:
• You’ll be prompted to select a server configuration. This includes choosing:
• Location: Select the data centre region closest to your target audience or yourself for better performance.
• Operating System: Choose the OS you want to install on your server. Options usually include various flavours of Linux (like Ubuntu, CentOS, Debian) and Windows Server.
• Server Plan: Select the server plan that fits your needs in terms of CPU, RAM, storage, and bandwidth. UpCloud offers flexible plans that you can customize according to your requirements. -
Configure Server Settings:
• Give your server a name for easy identification.
• Optionally, you can add SSH keys for secure remote access. If you don’t have SSH keys, you can set up a password for remote access.
• Choose additional features or add-ons if needed, like backups or private networking. -
Deploy the Server:
• After configuring the server settings, review your choices to ensure everything is correct.
• Once you’re satisfied, click on the “Deploy” or “Create Server” button to initiate the deployment process. -
Wait for Deployment:
• UpCloud will now provision your server according to the specified configuration. This usually takes a few minutes.
• You can monitor the progress of server deployment from the dashboard. -
Access Your Server:
• Once the server is deployed, you’ll receive the necessary information to access it, such as IP address, username, and password or SSH key.
• Use this information to connect to your server via SSH (for Linux) or -
Configure Server:
• Once connected to your server, you can start configuring it according to your needs. This may include installing software, setting up web servers, databases, or any other services you require. -
Security Measures:
• Implement necessary security measures such as firewall configurations, regular updates, and monitoring to keep your server secure. -
Regular Maintenance:
• Regularly update your server’s software and operating system to ensure optimal performance and security.
• Monitor server performance and resource usage to identify any issues early on.
That’s it! You’ve successfully set up a server with UpCloud and configured it to start serving your needs.
We will now move on to setting up the diode proxy server to allow us remote access. I am located behind a Starlink in the Philippines, and as you can see in the video, I have set up a London-based server, which I will use to tunnel and proxy everything from my Philippines location to the UK.
Step 1 we will SSH into our new upcloud server and install diode click here to rub the curl bash script or download the cli Download Hub | Diode™
Step 2. Run this command curl -Ssf https://diode.io/install.sh | bash
Step3. Make sure to run the export command export PATH=/root/opt/diode:$PATH. This allows you to have a diode in the path and run it from anywhere.
Step 4. Repeat the steps above for your local PC
Step 5. On the server side run this command diode config and take note of the client address that is printed out, it will look something like this
INFO Diode Client version : v0.13.5 25 Nov 2023
INFO Client address       : 0x2248123d8959186a3eee4f28f945xxxxxxxxxxxx
INFO Fleet address        : 0x6000000000000000000000000000000000000000
INFO <KEY>                : <VALUE>
INFO last_update_at       : 0x66360757
INFO lvbh3                : 0x0000018dfaca1335dda92e8bfa6d46e9ccd9b388726127e88ca34f66b6b69556
INFO lvbn3                : 0x6e011c
INFO <address>            : 0x2248123d8959186a3eee4f28f945 xxxxxxxxxxxx
INFO private              : <********************************>
Step 6. On the server side run diode publish -public 1080:1080 -socksd
Step 7. Now we are ready to run the command on the client side and connect our endpoint to create a VPN connection run diode -bind 1080:0x2248123d8959186a3eee4f28f945xxxxxxxxxxxx:1080. You will see the following output
INFO Client address       : 0xe78aab27d263cc497a20411793d3xxxxxxxxxxxx
INFO Fleet address        : 0x8831c475ab58809f24925075d341xxxxxxxxxxxx
INFO Network is validated, last valid block: 720xxxx 0x00000da8f34792fee30e5f756c7068949f4a712d988bb47exxxxxxxxxxxx
INFO Client name          : myname.diode
INFO
INFO Bind      <name>     : <mode>     <remote>
INFO Port       1080      :   tls     0x2248123d8959186a3eee4f28f945xxxxxxxxxxxx:1080
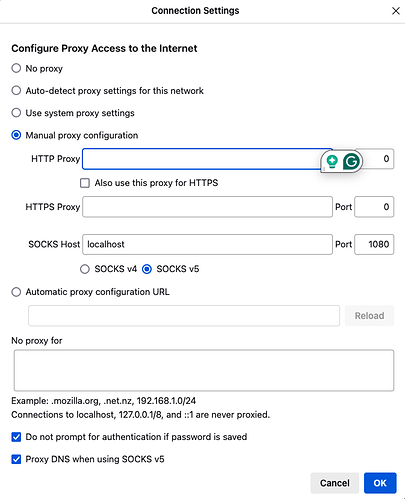
Now go to your firefox browser and click on the 3 lines top right and choose settings and scroll to the bottom, and choose Network Settings
Step 8. Choose manual proxy configuration in socks host put localhost and port 1080. Select Socks v5 and check Do not prompt for authentication and Proxy DNS when using SOCKS v5
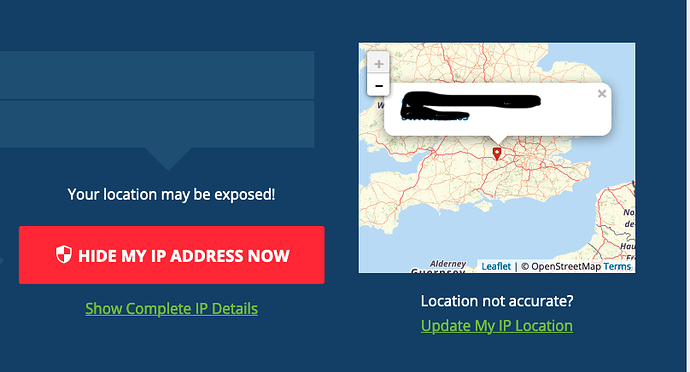
Step 9. Go to the browser and enter https://whatismyipaddress.com/
Step 10. You can now see that you have a personal VPN connection, and you can surf as though you were at that location.
In my case, it shows that I am connected to the UK, and happy surfing; now, why not set up another location, use it on the go, and share it with your friends and family?


